| Summary: | This article provides information on how to Configure Debug Logs for intelli-CTi™ |
| Article Type: | How-To / Troubleshooting |
| Related Product(s): | This article relates to the following products:
|
| Related Articles: |
Summary
If you are experiencing issues with intelli-CTi or QGate Breeze, you may be asked to provide logs to be analysed by Technical Services. Below are the steps required to configure, locate and send logs for intelli-CTi and QGate Breeze. You can also follow the intelli-CTi interactive guide here to setup intelli-CTi or QGate Breeze for debugging.
Best Practice
When providing logs for a specific issue, its best practice to follow these basic steps, these are described in more detail below.
- Archive any old logs
- Increase the logging level appropriately (as mentioned below)
- Reproduce the issue and make a note of the time at each point of the process
- Use the built in zip tool from Windows to compress all logs created
- Send the files to support@QWARE.co.uk making sure you quote the ticket number
- Revert logging level back once the issue is resolved
How to configure logging for QGate Breeze
- Open QGate Breeze Configuration.
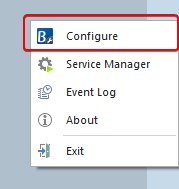
- Right click on the QGate Breeze bar and select Configure, OR…
Navigate to Start > All Programs > QGate Breeze > QGate Breeze Settings
 Select the General Settings Tab.

Make a note of the current logging level. Set logging level to Debug (All).

- Make a note of the Logging Path listed in the dialog. Use Windows Explorer to navigate to this location or click on the ‘view log files button’. You may either remove existing log files or zip and archive them.
- Go through the steps to reproduce the issue, note that if this is an intermittent issue you may need to keep this high level logging running for some time. If you are able to note down the time that the issue occurs, this will assist the support team with locating any errors in the log files.
- Navigate to the logging path from the previous step, zip all files in the directory and send the files to support@QWARE.co.uk, making sure you quote your ticket reference number.
- Once this is complete you may return the logging level to its original value, however, unless this is causing problems, we do not recommend to do this until the issue is resolved and your ticket is closed.
How to configure logging for intelli-CTi
- Open QGate Breeze Configuration.
- Right click on the QGate Breeze bar and select Configure, OR…
Navigate to Start > All Programs > QGate Breeze > QGate Breeze Settings
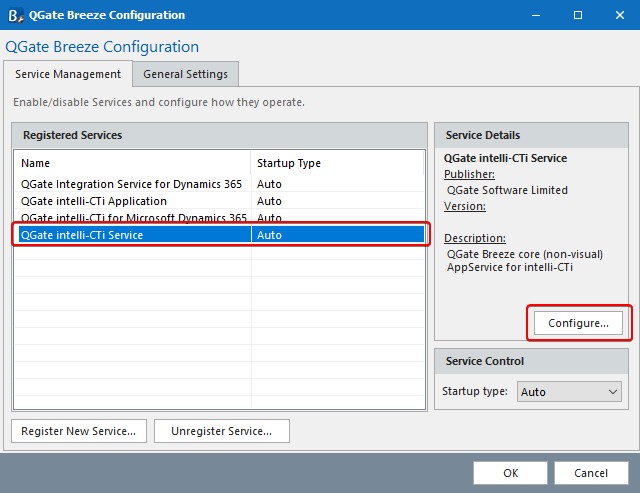
 Highlight intelli-CTi Service and click [Configure].
Click [Configure intelli-CTi Connections…].

Make sure the correct connection type is selected and click [Configure…].

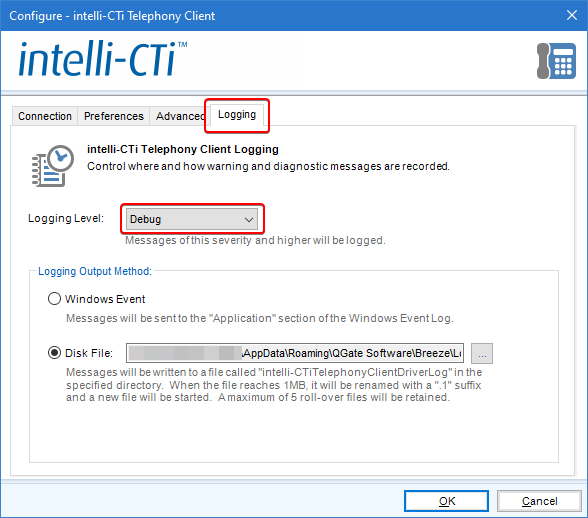
- Click on the Logging tab.
Make a note of the current Logging Level, then change the logging level to Debug. Select Disk File as the output method. You can change where the log file is created, but we recommend leaving the default location to avoid permission issues.

- Use Windows Explorer to navigate to this location. You may either remove any existing log files or zip and archive them
- Go through the steps to reproduce the issue, note that if this is an intermittent issue you may need to keep the logging running for some time. If you are able to note down the time that the issue occurs, this will assist the support team with locating any errors in the log files.
- Navigate to the logging path from the previous step, zip all files in the directory and send the files to support@QWARE.co.uk, making sure you quote your ticket reference number.
- Once this is complete you may return the logging level to it’s original value, however, unless this is causing problems, we do not recommend to do this until the issue is resolved and your ticket is closed.
| Related Resources: | |
| Further Information: |
